• When you click on links to various merchants on this site and make a purchase, this can result in this site earning a commission. Affiliate programs and affiliations include, but are not limited to, the eBay Partner Network.

RAAF ww2

dinomartino1

Well-Known Member
Throughout the inter-war years the RAAF focused on local defence and providing training opportunities to Australia's naval and military forces. It also undertook aerial survey missions, meteorological flights, public displays, and provision of defence aid to the civil community, undertaking search and rescue missions and bush fire patrols. In the late 1930s, the force was expanded amidst concerns about a future war in Europe. Additional squadrons were raised and bases established away from the south-east coast, including airbases in Western Australia, Queensland and the Northern Territory.This expansion saw the RAAF increase its personnel from under 1,000 in 1935 to around 3,500 in 1939, and the establishment of a force of 12 squadrons, with plans for a further six, by the outbreak of WW2 in September 1939.
Shortly after the declaration of war in Europe, although Australia's air force was small consisting of just 246 aircraft the Australian government offered to send six squadrons to Britain to fight, in addition to the 450 Australians who were already serving in the ranks of the Royal Air Force at the time. The RAAF already had one squadron in the United Kingdom, 10 Sqn RAAF which had been dispatched earlier in the year to take ownership of nine Short Sunderland flying boats and return them to Australia. They subsequently took place in their first operational mission on 10 October 1939, when they carried out a sortie to Tunisia.
About 20,000 Australian personnel had served with other Commonwealth air forces in Europe during World War II. A total of 216,900 men and women served in the RAAF, of whom 9,780 lost their lives. At war's end, a total of 53 RAAF squadrons were serving in the Pacific and a further 17 in Europe. After the surrender of Japan at the end of ww2 with over 152,000 personnel operating nearly 6,000 aircraft it became the world's fourth largest air force, after those of the USA, the USSR and the UK


large_000000-2.jpg

Armourers wheeling trolleys of 500-lb MC bombs to De Havilland Mosquito FB Mark VIs of No. 464 Squadron RAAF at Hunsdon, Hertfordshire. The further aircraft, MM412 'SB-F', survived the war to be sold to the Yugoslav Air Force in 1952.
large_000000-3.jpg

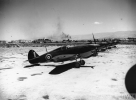
Flying Officer P St.G B Turnbull and Flying Officer J H W Saunders of No. 3 Squadron RAAF walking away from one of the Squadron's Curtiss Tomahawk Mark IIBs at Rosh Pinna, Palestine.


large_000000-5.jpg

Australian pilots of No 453 Squadron help to flatten the airstrip at Longues-sur-Mer (B-11). Flying Officer D Osborne and Pilot Officer A Rice man a jeep, while Pilot Officer J Scott steadies the two 500lb bombs being used to add weight to a locally acquired agricultural roller. In the background, Spitfires of No 602 Squadron depart on an operation, watched by a runway controller working from a converted sentry box.
large_000000-6.jpg

Sergeant R G Goldberg of No. 451 Squadron RAAF delivers his report to an Army Liaison Officer at a landing ground in the Western Desert, after completing a tactical reconnaissance sortie. Behind them, Goldberg's Hawker Hurricane Tac. R Mark I, Z4771, is being serviced by the Squadron's ground crew.

large_000000-7.jpg

Squadron Leader R H M "Bobby" Gibbes, Commanding Officer of No. 3 Squadron RAAF, sitting in the cockpit of his Curtiss Kittyhawk, shortly after rescuing one of his pilots who had been brought down by anti-aircraft fire while the Squadron was attacking an enemy airfield on 21 December 1942. Gibbes landed his aircraft by the wreckage and took the pilot into his own cockpit. Although a wheel was knocked off on take-off, they got airborne safely and returned to base at Marble Arch, Libya, where he managed a successful landing on one wheel. The award of a DSO followed


large_000000-8.jpg

Handley Page Halifax B Mark II Series I, W1176 'Z', of No. 462 Squadron RAAF, awaits its load of 500-lb MC bombs, being prepared by armourers in the foreground, at Fayid, Egypt, before a night raid to Benghazi or Tobruk (the "Mail Run") is undertaken. The photograph was taken shortly after the formation of the Squadron when Nos. 10/227 and 76/462 Combined Squadrons were merged at Fayid on 7 September 1942
large_000000-9.jpg

A gathering of men of No 467 Squadron, Royal Australian Air Force to celebrate the completion of 100 operations by the Avro Lancaster R5868/`PO-S' (S for Sugar) after its sortie on 11 - 12 May 1944 to a communications target in Belgium. Below the cockpit of the Lancaster are the emblems indicating the number of operational flights and the award of three DSOs and two DFCs to crew members.
large_000000.jpg

Pilots of No. 3 Squadron RAAF study a map on the tailplane of one of their Gloster Gladiators at their landing ground near Sollum, Egypt, before an operation over Bardia during the closing stages of Operation COMPASS
 
Last edited:

dinomartino1

Well-Known Member
large_000000-2.jpg

Flight Lieutenant P C C Kerr RAAF taxies De Havilland Mosquito FB Mark VI, HX912 'SB-F', of No. 464 Squadron RAAF onto the main runway at Sculthorpe, Norfolk, before taking off on the first Mosquito raid mounted by No. 140 Wing of No. 2 Group. Twenty-four aircraft from No. 464 and No. 487 Squadron RNZAF successfully attacked two power stations in France, all returning safely. However, during the Wing's next operation six days later, while attacking the aircraft engine works at Woippy, near Metz, HX912 was brought down and Kerr and his navigator, Flying Officer B J E Hannah RNZAF, were both killed.

large_000000-3.jpg

Handley Page Halifax Mark II Series I, W1170 'U', of No. 462 Squadron RAAF, taxying out at Fayid, Egypt, for a night raid on Axis positions in North Africa. The photograph was taken shortly after the formation of the Squadron when Nos. 10/227 and 76/462 Combined Squadrons were merged at Fayid on 7 September 1942
large_000000-4.jpg

The crew of an Avro Lancaster of No 467 Squadron RAAF don their flying clothing and collect their lifejackets and parachutes in the Squadron Crew Room at Waddington, Lincolnshire.
large_000000-5.jpg

Aircrews of No. 463 Squadron RAAF sitting at their crew tables in the Squadron Briefing Room at Waddington, Lincolnshire, as their Commanding Officer, Wing Commander R Kingsford-Smith (standing left foreground) briefs them for the evening's operation, an attack on the railway yards at Juvisy-sur-Orge, France.
large_000000-6.jpg

Supermarine Spitfire Mark IX, 'FU-V', of No. 453 Squadron RAAF preparing to taxy at Ford, Sussex, for a sortie over Normandy. The aircraft carries a 44-gallon long-range fuel tank under the fuselage to enable it to extend its operational radius on the continent.
large_000000.jpg

Oblique aerial photograph taken from a Bristol Beaufighter TF Mark X of No. 455 Squadron RAAF, during a joint attack by the Langham and North Coates Strike Wings on shipping lying at anchor off Marsdiep, between Den Helder and Texel, Holland. Here Beaufighters can be seen attacking German minesweepers with rocket projectiles and cannon fire, as a salvo of RPs from the photographing aircraft is released at the nearest vessel. Three Beaufighters were lost and 17 others were damaged as a result of the intense barrage of anti-aircraft fire from the ships and shore batteries, although 11 vessels were sunk or damage
 

dinomartino1

Well-Known Member
large_000000-6.jpg

Wing Commander R H Young, the Commanding Officer of No. 464 Squadron RAAF, standing by his Lockheed Ventura Mark II at Feltwell, Norfolk, shortly after leading the No. 2 Group Venturas on the successful daylight raid on the Philips radio and valve works at Eindhoven, Holland, (Operation OYSTER), on 6 December 1942.

large_000000-3.jpg

Curtiss Tomahawks of No. 3 Squadron RAAF, lined up at Rayak, Lebanon.
large_000000-4.jpg

Curtiss Tomahawk Mark IIBs of No.3 Squadron RAAF, being refuelled at Rayak, Lebanon.

large_000000-5.jpg

Armourers roll 500-lb MC bombs towards a Handley Page Halifax B Mark II Series of No. 462 Squadron RAAF, in a sandbagged revetment at Fayid, Egypt, before a night raid to Benghazi or Tobruk (the "Mail Run") is undertaken. The photograph was taken shortly after the formation of the Squadron when Nos. 10/227 and 76/462 Combined Squadrons were merged at Fayid on 7 September 1942.
large_000000-7.jpg

A Lockheed Ventura of No. 464 Squadron RAAF flys over the docks at Flushing, Holland, during an attack by 12 aircraft on the De Schelde shipbuilding yards. Smoke from explosions can be seen rising from the De Schelde engine shops and adjacent buildings in the Marine Dock, and the oil storage tanks on the east side of the Verbreed Canal.
large_000000.jpg

Armourers hand-winch a 500-lb MC bomb to the wing loading-point on De Havilland Mosquito FB Mark VI, MM403 'SB-V', of No. 464 Squadron RAAF at Hunsdon, Hertfordshire.
 

Attachments

  • image.png
    image.png
    580.5 KB · Views: 146

dinomartino1

Well-Known Member
large_000000-2.jpg

A salvo of eight rocket projectiles being fired over the North Sea by Bristol Beaufighter TF Mark X, NE543 'UB-E', of No. 455 Squadron RAAF based at Langham, Norfolk.
large_000000-3.jpg

Still from film shot by the RAF Film Production Unit, showing Lockheed Ventura Mark II, AJ466 'SB-H', of No. 464 Squadron RAAF based at Methwold, Norfolk, approaching the French coast while en route to attack the airfield at Morlaix with eleven other aircraft of the Squadron
large_000000-4.jpg

Squadron Leader K W "Bluey" Truscott, Commanding Officer of No 452 Squadron RAAF at Redhill, Surrey. He began his operational flying with the Squadron in August 1941, rising to its command in January 1942. When this photograph was taken, he had just received notice of his posting back to Australia, having shot down 16 enemy aircraft. He later commanded No 76 Squadron RAAF in the South-West Pacific area, and was killed in a flying accident on 28 March 1943.
large_000000-5.jpg

Wing Commander K M Hampshire, Officer Commanding, No. 456 Squadron RAAF (left), and his navigator, Flying Officer T Condon, survey the wreckage of one of two Junkers Ju 88s, which they shot down on the night of 27/28 March 1944. This particular victim fell just outside the boundary of the Squadron's base at Ford, Sussex.
large_000000-6.jpg

Buffalo Mark Is of No. 453 Squadron RAAF, lined up at Sembawang, Singapore, on the occasion of an inspection by Air Vice Marshal C W H Pulford, Air Officer Commanding Royal Air Force Far East.
large_000000-8.jpg

Flying Officer A C Rawlinson, Flight Lieutenant B R Pelly and Flying Officer A H Boyd of No. 3 Squadron RAAF, walk away from Gloster Gladiator Mark II, N5752 'NW-G', at LG 10/Gerawala, Egypt, on the day following their major engagement with 17 Italian fighters over Bir Enba, Libya, during which a fourth pilot, Squadron Leader P R Heath, was shot down and killed. Boyd scored three victories in N5752 before it was shot down by Italian fighters near Sollum on 13 December 1940.
large_000000-9.jpg

Beaufighter TF Mark X, NE798, of No. 455 Squadron RAAF, in its dispersal at Langham, Norfolk, carrying two 500-lb MC bombs on a centreline attachment under the fuselage.
 

dinomartino1

Well-Known Member
large_000000-3.jpg

Handley Page Hampden TB Mark I, AN148 'K', of No. 455 Squadron RAAF Detachment, flying back to Wick, Caithness, after sustaining damage to its port rudder from anti-aircraft fire while attacking shipping off Norway.
large_000000-4.jpg

A Handley Page Hampden TB Mark I sweeps over the target during a torpedo attack by 7 aircraft from No. 455 Squadron RAAF and No. 489 Squadron RNZAF on an armed German supply ship off Egero, Norway. After a number of hits the vessel blew up and sank by the stern
large_000000-5.jpg

Ventura Mark II, AE939 ‘SB-C’, of No. 464 Squadron RAAF based at Feltwell, Norfolk, in flight.
large_000000-6.jpg

Two Bristol Beaufighter TF Mark Xs of No. 455 Squadron RAAF, line up on the runway at Dallachy, Morayshire, prior to take off.
large_000000-7.jpg

Flying Officer Lee Turner RAAF (navigator, left) and Flying Officer Steve Sykes RAAF (pilot, right) of No. 455 Squadron RAAF, inspect the top of an armed trawler's mast which became embedded in the nose of their Bristol Beaufighter TF Mark X during a low-level attack on enemy shipping in the harbour of Marsdiep, Holland, by the combined Langham and North Coates Strike Wings on 12 September 1944. Sykes brought the damaged aircraft back to Langham and made a successful crash-landing, in which Turner was slightly injured.
large_000000-8.jpg

Curtiss Kittyhawk Mark IAs of No. 3 Squadron RAAF lined up at LG 91, Egypt.
large_000000-9.jpg

Curtiss Tomahawk Mark IIBs of No.3 Squadron RAAF, lined up at Rayak, Lebanon.
large_000000-10.jpg

Gladiator Mark II, N5786, of No. 3 Squadron RAAF, airborne from their landing ground near Sollum, Egypt, during the last stages of the British assault on Bardia (Operation COMPASS
large_000000.jpg

Brewster Buffalo Mark Is of No. 21 Squadron RAAF, lined up at Sembawang, Singapore, on the occasion of an inspection by Air Vice Marshal C W H Pulford, Air Officer Commanding Royal Air Force Far East.
 

dinomartino1

Well-Known Member
large_000000-5.jpg

DH.86, A31-7, of No. 1 Air Ambulance Unit RAAF, in flight over North Africa.
large_000000-7.jpg

Seven Gloster Gladiators of No. 3 Squadron RAAF make a low pass in loose line abreast formation over the Squadron's mobile operations room at their landing ground near Sollum, Egypt, from which they operated during Operation COMPASS.
large_000000-8.jpg

Curtiss Kittyhawk Mark IV, FX745 'OK-Y', of No. 450 Squadron RAAF, taxying to the runway at Cervia, Italy, loaded with three 250-lb GP bombs for a sortie in support of the 8th Army's spring offensive in the Po Valley.
large_000000-9.jpg

North American Mustang Mark IIIs of No. 3 Squadron RAAF, parked on a concrete hard standing at rain-drenched Fano, Italy.

large_000000-10.jpg

An RAAF Wing Commander inspects a 1,000-lb GP bomb slung beneath the fuselage of a Curtiss Kittyhawk Mark IV of No. 450 Squadron RAAF in a dispersal at Cutella, south of Vasto, Italy. Two 500-lb GP bombs are also slung from the wing loading points

large_000000-11.jpg

Personnel of No. 3 Squadron RAAF carry their baggage to the train for Ismailia, after disembarking at Port Tewfik, Egypt. No. 3 Squadron was the first RAAF unit to leave Australia for a war zone, its 21 officers and 271 airmen, under the command of Squadron Leader I D McLachlan, sailing from Fremantle for Egypt on board the SS ORONTES on 24 July 1940.

large_000000-12.jpg

Groundcrew of No. 458 Squadron RAAF sit underneath one of the Squadron's Vickers Wellington Mark XIVs at Gibraltar, while another aircraft takes off past the Rock.
 

dinomartino1

Well-Known Member
large_000000-2.jpg

De Havilland Mosquito FB Mark VI, HX913 'SB-N', of No. 464 Squadron RAAF based at Hunsdon, Hertfordshire, in flight

large_000000-4.jpg

Supermarine Spitfire Mark IXs of No. 453 Squadron RAAF, are started up at Ford, Sussex for a sortie over Normandy. Both aircraft are carrying 44-gallon long-range fuel tanks under the fuselage to extend the their range over the continent. Behind them can be seen a De Havilland Mosquito NF Mark XVII of No. 456 Squadron RAAF, also based at Ford in order to provide night defence over southern England.

large_000000-14.jpg

The first Lancaster to be flown from the United Kingdom to Australia created a record in the process and has now flown on from Melbourne to Wellington, New Zealand. The plane has just arrived in New Zealand having completed the second part of her record flight in 7 hours 37 minutes. She was again the first Lancaster to cover the trip from Melbourne to Wellington. Throughout these vast journeys she was piloted by an all Australian "Pathfinder" crew. Picture shows: The Lancaster and the all Australian crew.
large_000000-15.jpg

Brewster Buffalo Mark Is for the re-equipment of Nos. 21 and 453 Squadrons RAAF, being inspected by RAF personnel at Sembawang, Singapore.
large_000000-16.jpg

A BOAC tender taking off passengers from Short S.23 'C' Class Empire Flying Boat, G-AETZ "Circe", moored on Lake Tiberias, Palestine, while serving with Qantas. "Circe" was lost, probably to enemy action on 28th February, 1942, while flying from Tjilitjap, Java, to Broome in North Western Australia.
large_000000-17.jpg

A Bristol Bombay of No. 1 Australian Ambulance Unit on the ground at Sfax, Tunisia, while disembarking sick Indian prisoners-of-war recently released from captivity.
large_000000-18.jpg

Pilots of No 452 Squadron RAAF, standing in front of a Supermarine Spitfire Mark IIA at Kirton-in-Lindsey, Lincolnshire. This unit was the first Australian squadron to be formed in Fighter Command.
 

dinomartino1

Well-Known Member
large_000000-19.jpg

A Bristol Blenheim Mark IV drops a mixed load of 250-lb and 40-lb GP bombs from its bomb-carriers over Vichy French positions in Syria.

large_000000-20.jpg

Avro Lancasters of Nos. 463 and 467 Squadrons RAAF parked either side of the perimeter track in front of the watch office and hangars (right) at snow-bound Waddington, Lincolnshire. The aircraft were marshalled there in order to prevent them from being snowed in at their dispersals.
large_000000-21.jpg

Wing Commander Clive 'Killer' Caldwell, the most successful Australian fighter pilot of the war with 28 victories, posing beside his Spitfire. He flew against the Germans in North Africa and then led the Australian Spitfire Wing in Northern Australia against the Japanese.
large_000000-23.jpg

Kiwis
Pilots of No. 486 Squadron RNZAF wait for action in their dispersal area by Will's Farm at Newchurch Advanced Landing Ground, Kent. Standing fifth from the left, looking towards the camera, is the unit's Commanding Officer, Squadron Leader J H Iremonger.

large_000000-24.jpg

Important in the aerial defence of Malaya are the personnel from the Australian Air Force flying American Lockheed Hudsons and Australian-built Wirraway fighter reconnaissance aircraft. Picture shows:- Royal Australian Air Force men in the air with Wirraways during training in Malaya.
 

dinomartino1

Well-Known Member
large_000000-2.jpg

A Handley Page Hampden Mark I, AT137 'UB-T', of No 455 Squadron RAAF based at Leuchars, Fife, Scotland, in flight above clouds, May 1942.
large_000000-3.jpg

The first all Australian crew in Bomber Command to complete a tour of operations (with No 466 Squadron, Royal Australian Air Force) stand in front of their Vickers Wellington bomber at RAF Leconfield, Yorkshire. Left to right: Flight Sergeant J P Hetherington (bomb aimer), Pilot Officer A C Winston (rear gunner), Pilot Officer J H Cameron (captain), Flight Sergeant J Samuels (W/O - air gunner), and Pilot Officer J J Allan (navigator).
large_000000-4.jpg

Westland Lysander Mark II, 'JV-E', based at Ramleh, Egypt, makes a low-level 'attack' on Australian infantry during an anti-aircraft exercise in the Western Desert.

large_000000-5.jpg

Lancaster W4783/AR-G "G for George" of No 460 Squadron, RAAF, was delivered in October 1942 and went on to complete ninety operations. It is seen here running up its engines at Prestwick on 11 October 1944, before setting out on its long retirement journey to Australia, where it was to be preserved as a memorial to the Australians of Bomber Command.

large_000000-6.jpg

Sergeant W Sinclair, RAF, and Flying Officer E H Giersch, RAAF, of No 463 Squadron at Waddington, test their oxygen masks in the crew room before an operational sortie, April 1944.
large_000000-7.jpg

A Lancaster crew of No 467 Squadron, RAAF, at Bottesford, Leicestershire, preparing to set off for Berlin on the evening of 31 August 1943. They are, from left: Flight Sergeants J Scott, G. Eriksen and A Boys, Sergeant C Adair, Flight Sergeant B Jones (Captain), Flight Sergeant J Wilkinson and Sergeant E Tull, RAF, the only Englishman in the crew.
large_000000-8.jpg

Armourers load 250-lb GP bombs into a Lockheed Ventura Mark II of No. 464 Squadron RAAF at Methwold, Norfolk, using a bomb-trolley borrowed from No. 487 Squadron RNZAF
large_000000.jpg

A production line of Bristol Beaufort torpedo bombers at an Australian aircraft factory, October 1942.
 

dinomartino1

Well-Known Member
large_000000-2.jpg

Handley Page Halifax B, Mk III, LL599 'Z5-E', of No 462 Squadron RAAF based at Driffield, Yorkshire, in flight over the North Sea while on the way to attack synthetic oil plants in the Ruhr, September 1944. This aircraft was lost over Germany on 23 October 1944, when it collided with an Avro Lancaster of No. 625 Squadron RAF while returning from a raid on Essen
large_000000.jpg

Flying Officers C H Tindale DFM (wireless operator) and W C Gordon DFC (navigator) in Lancaster W4783/AR-G, 'G for George' of No 460 Squadron, Royal Australian Air Force, Prestwick, 11 October 1944. The veteran aircraft, which had completed 90 operations over enemy territory, was about to set off on its long journey to Australia, where it was to be presented as a gift to the Australian War Memorial in Canberra.
 

dinomartino1

Well-Known Member
large_000000-2.jpg

Aircrew of No. 40 Squadron RAF don their flying equipment before boarding their Vicker Wellington B Mark X at Foggia Main, Italy, for the last night bombing operation undertaken by the type. Six Wellingtons accompanied a force of Consolidated Liberators making an attack on the marshalling yards at Treviso on the night of 13/14 March 1945. The crew are, (left to right): Sergeant R Turner of London, (tail Gunner); Flying Officer A Merrick of Birmingham, (navigator); Pilot Officer P Faulkner of Te-Kuiti, New Zealand, (bomb-aimer); Pilot Officer J Burnett of Kensington Park, South Australia, (pilot); and Flight Sergeant Radcliffe of Liverpool, (wireless operator/air gunner).

large_000000-3.jpg

The crew of "Battlin' Bitch", a Consolidated Liberator B Mark VI of No. 159 Squadron RAF study maps by the nose of their aircraft before setting out on a sortie from Digri, India. They are, (front row, left to right): Sergeant J F Barnett of Aldershot, Hampshire, Sergeant G W H Moth of Portsmouth, Hampshire, and Sergeant D C Donovan of Rayleigh, Essex, (back row); Sergeant J D L Willshire of Bournemouth, Hampshire, Sergeant K R Baverstock of Weston-super-Mare, Sergeant F Holroyd of Cleckheaton, Yorkshire, Pilot Officer N F Robinson of Brisbane, Australia, and Sergeant R A Croft of Portsmouth, Hampshire
large_000000-4.jpg

The crew of a Martin Baltimore Mark IV of No. 223 Squadron RAF walk from their aircraft (FA394) at Celone, Italy, after successfully completing a bombing sortie to enemy targets in the Popoli area. They are, (left to right): Sergeant S A Jupp (pilot), of Gravesend, Kent; Flight Sergeant W G Gidley (navigator), of Callington, Cornwall; Sergeant W A Airth (air gunner), of Hamilton, Lanarkshire, and Warrant Officer J W Simpson (wireless operator), of Sydney, Australia
large_000000-5.jpg

Catalina Mark IB FP244/G-AGFM ‘2’ "Altair Star", operated by QANTAS, flying along the coast of Ceylon at the conclusion of a long-haul flight from Australia
large_000000.jpg

Flight Lieutenant J L Lowther of No. 43 Squadron prepares to take off in his Supermarine Spitfire Mark IX from Nettuno, Italy, helped by the ground crew. Lowther, from Brisbane, Australia, is being assisted by (left to right); Leading Aircraftmen W Ashfield of Birmingham, P Hayles of Wembley, A Torrance of Kirkcaldy and S Massey of Aberdeen. Note the small Squadron badge painted on the nose below the exhaust stubs.
 

dinomartino1

Well-Known Member
large_000000-2.jpg

The Drive for Messina 10 July - 17 August 1943: Flying Officer Colin Edmends from Australia and his fitter, D McMinnemy, inspect the tail of his Curtiss Kittyhawk after it was damaged during a sortie over Catania.
large_000000-3.jpg

Sergeant B. Bawden of Sydney and Hurricane IIC HL 865 Night Duty, both of No 87 Squadron at Charmy Down, 2 September 1942.
large_000000-4.jpg

A Boeing B-17 crew of the 5th Bombardment Wing, 15th USAAF, after returning to Amendola, Italy, from a daylight bombing mission over Sofia, Bulgaria, have driven over to the dispersals of No. 150 Squadron RAF to wish a crew of a Vickers Wellington Mark X good luck before they take off for a night raid on the same target. The RAF crew are, (right to left): Sergeant M Jefferson of Manchester, (wireless operator); Sergeant G Heywood of Upton-by-Chester, (rear gunner); Flight Lieutenant V T "Bill" Skehill of Kooyong, Australia, (pilot), who is shaking hands with the American crew captain, 2nd Lieutenant Walters; Flying Officer P R Jameson of Brisbane, Australia, (navigator), and Flight Sergeant E W Turner of Northfleet, Kent, (bomb aimer).
large_000000.jpg

Warrant Officer R E Partidge of Brisbane, Australia, (left) and Sergeant Cyril Potter of Northampton, two pilots of No. 152 Squadron RAF at Sinthe, Burma, examine the damage caused to the elevator of Potter's Supermarine Spitfire Mark VIII during a dogfight with Japanese 'Oscars'.
 

dinomartino1

Well-Known Member
large_000000-2.jpg

The crew of a Vickers Wellington Mark X of No. 150 Squadron RAF receive a final briefing from their flight commander before taking off from Kairouan, Tunisia, for a raid on targets in the Salerno area on the day before the Allied landings there, (Operation AVALANCHE). Pictured are, (left to right): Sergeant J Umbers of Coulsdon, Surrey, (wireless operator/air gunner); Sergeant J Baxter of Ayrshire, Scotland, (bombardier); Squadron Leader E Le P Langlois of Clarence Park, South Australia, (Commander, 'A' Flight); Flight Sergeant S S M Tunstall of Boonah, Queensland, Australia, (pilot); Sergeant F Doyle of Crosby, Liverpool, (navigator), and Sergeant M Hayes of Lismore, Eire, (rear gunner).

large_000000-3.jpg

Australian pilots of No. 452 Squadron relax outside their dispersal hut at Kirton-in-Lindsey, 18 June 1941.
large_000000-4.jpg

Supermarine Spitfire Mark V, P7973 'R-H', in the markings of either No. 57 or No. 61 Operational Training Units. This aircraft, originally a Mark IIA, was flown by a number of pilots, including Squadron Leader K W "Bluey" Truscott of No. 452 Squadron RAAF, who scored 16 victories in the United Kingdom before returning to Australia in February 1942. P7973 was withdrawn from training duties in 1944 and in February 1945 was presented to the Australian War Memorial, Canberra,where it is presently displayed.
large_000000-6.jpg

Squadron Leader J H "Ginger" Lacey, Officer Commanding No. 17 Squadron RAF, sitting in the cockpit of his Supermarine Spitfire Mark VIII, talking to his Australian 'number two', Warrant Officer J A Sharkey, at Ywadon, Burma, shortly after Lacey had shot down a Nakajima Ki 43 south of Sagaing to claim his 30th and final victory of the War.
large_000000.jpg

Bristol Beaufighters from Nos. 144 and 254 Squadrons RAF, No. 455 Squadron RAAF and No. 489 Squadron RNZAF attacking German 'M' class minesweepers escorting a convoy off the Dutch coast, north-west of Borkum, with rocket projectiles. Thirteen aircraft can be seen in the photograph, which was taken over the tail of a Beaufighter of No. 455 Squadron after delivering its attack.
 

dinomartino1

Well-Known Member
large_000000-2.jpg

A Supermarine Spitfire Mk IIA of No. 452 Squadron RAAF landing at Kirton-in-Lindsey, Lincolnshire, over other aircraft parked in the 'B' Flight dispersals.

large_000000-3.jpg

Spitfire VBs of RAAF. 453 Squadron at Drem in Scotland, 14 August 1942.

large_000000-4.jpg

Lockheed Venturas and aircrew of No 464 Squadron, RAAF, at Feltwell, December 1942.
large_000000-5.jpg

Hurricane Tac. R Mark I, Z4641, of No. 451 Squadron RAAF, in flight during a reconnaissance sortie over Libya, with another aircraft of the Squadron acting as a 'sweeper' in the background. The pilot is Flight Lieutenant G F Morley-Mower.
large_000000.jpg

The only Australian night-fighter squadron in Fighter Command, No 456 was formed in June 1941at Valley in North Wales. This photograph shows armourers relaxing in their quarters in December of that year. They are, from left: Doug Andrews, Archie Clarke, Fred Howe, George Bryan and Herb Eacott. The message on the door reads: 'Please mind your language. Don't forget there are WAAFs about!'.
 

dinomartino1

Well-Known Member
large_000000-2.jpg

Halifax B Mark II Series 1 (Specials) of No. 462 Squadron RAAF, lined up at Hosc Raui, Libya.
large_000000-3.jpg

A Beaufighter of the Langham Strike Wing in action on 15 July 1944, when 34 Beaufighters from Nos 455 and 489 Squadrons, operating with No 144 Squadron from Strubby, surprised a convoy off the southern coast of Norway.
large_000000-4.jpg

Handley Page Halifax B Mark IIs of No. 462 Squadron RAAF parked on the perimeter track at Fayid, Egypt, before a night sortie against enemy columns retreating after the Battle of El Alamein.
large_000000-5.jpg

An airman cleans the cockpit windows of a Handley Page Halifax B Mark II Series 1 (Special), of No. 462 Squadron RAAF at Hosc Raui, Libya.
large_000000.jpg

The damaged tail of Curtiss Kittyhawk Mark IV, FX529, of No. 450 Squadron RAAF, which was flown back to base at Cervia, Italy, by the Squadron Commander, Squadron Leader J C Doyle, after being hit by anti-aircraft fire during a ground attack sortie over the 8th Army Front.
 

dinomartino1

Well-Known Member
large_000000-2.jpg

Three Avro Lancaster B Mark Is of No 44 Squadron, Royal Air Force based at Waddington, Lincolnshire, flying above the clouds. Left to right: W4125, `KM-W', being flown by Sergeant Colin Watt, Royal Australian Air Force; W4162,`KM-Y', flown by Pilot Officer T G Hackney, (later killed while serving with No 83 Squadron); and W4187, `KM-S', flown by Pilot Officer J D V S Stephens DFM, who was killed with his crew two nights later during a raid on Wismar.
large_000000-4.jpg

Operation CLARION: widespread attacks on communications facilities throughout Germany by the Allied Air Forces. Low-level oblique aerial photograph taken by De Havilland Mosquito FB Mark VI, HP924 'SB-C' of No. 464 Squadron RAAF, flown by Flying Officers G Nunn and H L Mitchell, while attacking the railway station at Soltau, Germany, showing trains and locomotives under attack with bombs and cannon fire.

large_000000-5.jpg

RAAF Squadron Leader Clive Caldwell, the CO of No. 112 Squadron RAF ("The Shark Squadron"), giving last minute instructions to Sergeant Jerzy Różański, originally of the Polish Air Force, for his operational flight over Cyrenaica. RAF Gambut, 24 March 1942.
large_000000-6.jpg

RAAF Squadron Leader Clive Caldwell, the CO of No. 112 Squadron RAF ("The Shark Squadron"), driving Polish airmen attached to the squadron to their aircraft in a Morris 15 truck for their operational flight over Cyrenaica. RAF Gambut, 24 March 1942.

large_000000.jpg

A Curtiss Kittyhawk Mark IV of No. 450 Squadron RAAF in a dispersal at Cutella, south of Vasto, Italy, with a 1,000-lb GP bomb slung underneath the fuselage, and two 500-lb GP bombs slung from the wing loading points. Note the pierced steel plandking (PSP) covering the dispersal surface.
 

dinomartino1

Well-Known Member
large_000000-2.jpg

Curtiss Kittyhawk Mark I, AK772 'GA-Y' "London Pride", of No. 112 Squadron RAF is prepared for a sortie at Gambut Main, Libya. The ground crew can just be seen assisting the pilot to strap himself into the cockpit. The aircraft is carrying a 250-lb GP Bomb, fitted with a surface-burst impact fuse, under the fuselage. Note also the plugs placed in the exhaust stubs to keep the desert sand out. AK772 was lost on a ground attack mission near Bir Hacheim on 30 May 1942; its Australian pilot, Pilot Officer H G Burney, was killed.
large_000000-3.jpg

Colonel L A Wilmot SAAF, Commanding Officer of No. 239 Wing RAF (centre), standing with two of his pilots at Cutella, south of Vasto, Italy, the day after leading the Wing on a highly successful strike to the Pescara River dam, which they destroyed with 500-lb bombs, and from which all aircraft returned safely. Standing with Colonel Wilmot are the pilots whose bombs first breached the dam walls; Flight Lieutenant K Richards of No. 3 Squadron RAAF (left), and Flight Sergeant A Duguid of No. 260 Squadron RAF (right).
large_000000-4.jpg

Severely damaged De Havilland Mosquito FB Mark VI, MM401 'SB-J', of No. 464 Squadron RAAF based at Hunsdon, Hertfordshire, parked at Friston Emergency Landing Ground, Sussex. The aircraft, flown by Squadron Leader A G Oxlade (pilot) and Flight Lieutenant D M Shanks (navigator), was hit by anti-aircraft fire while attacking a flying-bomb site in the Pas de Calais on 21 February 1944. The port engine was shattered, and the port undercarriage and most of the outer starboard wing was blown off. Despite the damage, the crew flew MM401 back and crash-landed safely at Friston ELG. The port engine nacelle is seen here supported by a caterpillar tractor to enable the aircraft to be moved off the runway. The aircraft was initially categorised as repairable (Category B), but this was changed to a write-off (Category E) after the full extent of the damage became clear.
large_000000.jpg

Flight Lieutenant J L Waddy of No. 260 Squadron RAF, sitting in the cockpit of the Curtiss Kittyhawk Mark I (named "Ve" after his wife) which he flew while a member of No. 250 Squadron RAF, at LG 91, Egypt. Waddy, an Australian, joined the RAAF in September 1940 and was posted to 250 Squadron RAF in Egyptin in November, following his pilot training. After claiming eight and one shared victories, he moved to 260 Squadron RAF at the end of May 1942. He enjoyed further success before being granted leave in June and joining No. 4 Squadron SAAF the following month. Waddy's final operational posting in North Africa was to No. 92 Squadron RAF in October 1942, with whom he scored the last of his 16 victories. He then returned to Australia where, after a period as a flying instructor, he was given the command of No. 80 Squadron RAAF whom he led until June 1945.
large_000000-6.jpg

Marshal of the Royal Air Force Lord Trenchard at B11/Longues while paying a visit to squadrons fighting in Normandy. Here he can be seen talking to Squadron Leader D H Smith , Commanding Officer of No. 453 Squadron RAAF, and his pilots, who had just returned from an armed reconnaissance during which 22 enemy vehicles were destroyed.
large_000000-5.jpg

On 2 August 1943, Hampden torpedo bombers of No 455 Squadron RAAF attacked a convoy off the Norwegian coast. This aircraft (L4105/D) suffered massive flak damage to its tail - half the elevator was blown away, the starboard fin twisted and the port rudder fouled by debris. The crew were forced to lash a rope around the rudder bar and took turns helping the pilot, Flying Officer Iain Masson, hold the aircraft straight as they limped back to Leuchars for a crash-landing
large_000000-7.jpg

Supermarine Spitfire Mark VB, of No 457 Squadron RAAF returning to Redhill, Surrey, after a sweep over northen France, whilst another Squadron aircraft stands at its dispersal point, plugged into a trolley accumulator at readiness.
large_000000-8.jpg

In June 1943 Leconfield in Yorkshire was home to No 196 and No 466 Squadrons, both equipped with the Wellington X. In this view, 'Y-Young/ers' receives some attention to its engines. Foaming tankards replace the more usual bomb symbols to indicate 14 successfully completed operations
 

dinomartino1

Well-Known Member
Is it okay to copy some of them and post them elsewhere?
I work eight days on and six off so I have a lot of free time to find this stuff, I go for the RAAF photos as like the Kiwis, Canadians and others from the Commonwealth countries in WW2 they don't get as much recognition
Australia has always been a huge country with a small population in 1939 it was only 6,968,000, the population of Holland in 1939 was 8,729,000 so Australia's contribution to the war effort was significant considering it's small manpower reserves.
Share the photos wherever you like, the more who see them the better, I get them from freely available to anyone sources.
 
Top