• When you click on links to various merchants on this site and make a purchase, this can result in this site earning a commission. Affiliate programs and affiliations include, but are not limited to, the eBay Partner Network.

My first jacket- look what I made! just like a big boy...

johnnynotoes-1

New Member
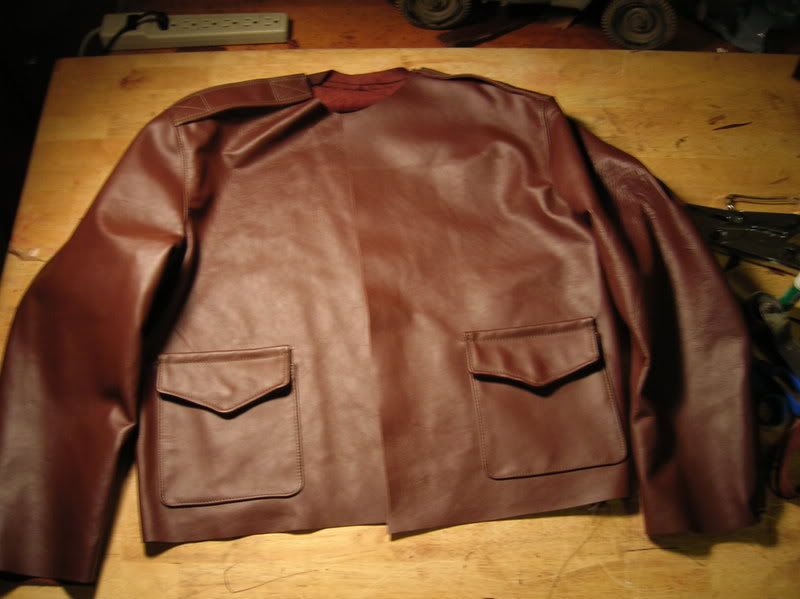
Crawfty wee laddie ent you? Interesting project...creativity comes in many forms and art is it's result. Dang you....havin' fun ain't yez! Everyone has a talent or two they say...you've put a few into action here! Do 'er up and good luck...looks great!
 

better duck

Well-Known Member
Jaydee said:
Don't be so hard on yourself and so quick to point out faults. (...) Keep up the good work! :)

Well, I for one appriciate you showing these 'faults', as they once again show us how difficult it is to make a well constructed jacket: it is a real trade, and not something done "on the fly", I think the expression is. But: keep up the good work indeed, and keep showing us whatever you produce!
 
A

Anonymous

Guest
You have a talent, keep up the good work. If you are as particular as I am about patch painting, it will take a while for you to be satisfied with the end product.
 

fishmeok

Well-Known Member
Thanks everybody. Apparently I need to spend some more time learning how to make a ^&%* pattern. When I sewed the waistband in the back rode up a good 4 inches above the front. Not bad if you have someone whose back is 6 inches shorter than their front....

So rather than rip this thing up I'm going to try adding a half belt to the back, like that civilian ATC jacket that was up on e-bay last week. Now that I know I can't be absolutely perfect on my first try can relax and have a little more fun with this. I am determined to make this bastard wearable.

Cheers
Mark

DSCN4175.jpg


DSCN4176.jpg


DSCN4179.jpg


DSCN4191.jpg
 

STEVE S.

Well-Known Member
what type of machine are you using?? the erratic stitch lengths are usually due to stitch tension settings & feeding technique on the thicker multi-layered pieces. what happens is the more layers you have together, the walking foot will pull the bottom layer or so & the top layers wont move the same length hence the shorter stitch on the top side. try slowing the speed you are sewing at & help feed the material uniformly thru the machine. i use a technique of holding the layers together with a hand on both sides of the foot, one in front on the material to be sewed & the other hand pulling a light tension on the sewn part.takes time & practice to get used to doing. also might loosen the thread stitch tensioner just a hair on the thicker parts, that will keep the stitches from pulling so tight & creating a smaller stitch. don't worry, you are doing great for a first timer!!

another tip if you are using a large industrial machine: i made a "throttle stop" for the foot pedal to keep the speed down to a manageable level until i had a little more experience. on a smaller home type machine, you can insert a piece of high density foam rubber in the foot pedal box between the box & pedal lever to kep the speed fluctuations down a little.
 

fishmeok

Well-Known Member
My machine has a walking needle- the needle goes through all the layers, then the entire assembly moves back, pulled by the needle and it's foot. I though I would be able to avoid the feeding issues with this system, but that has not been the case so far. I'm going to have to make some sort of a stop for the foot throttle like you suggested, the clutch motor on my machine is very grabby and will take the thing up to full speed faster then I can slow it down by letting off the pedal. Ideally I would like to get a servo motor, but that's a little ways off.
Cheers
Mark
 

jacketimp

New Member
food for thought:

if i cannot strive for originalilty(cos others were before me)......let me strive for perfection!


keep up your good work!
 

fishmeok

Well-Known Member
I'm calling this sucker- it's as done as can be. If I take it apart anymore I will only make things worse...
I haven't decided if I will finish the knit cuffs, may just save them for another coat. I ended up adding the half belt to lengthen the back, which worked pretty well. Found more things I need to practice, like topstiching. Making the parallel rows on the half belt was particularly trying.

The body ended up being too big around, I think this is more like a 48 short than a 44-46. Overall I guess I'm pretty happy with how it turned out. Lot of firsts involved here.
-First sewing project since a bike bag in home-ec in jr. high (25 years or so ago)
- First time making and using a pattern
- First time cutting up a hide
etc...
I have about $150 in materials in this thing, which is one of the reasons I was trying to make it wearable the first time out. This jacket stuff can get expensive quickly.
Cheers
Mark

Finished jacket, minus the knit cuffs:

DSCN4229.jpg


DSCN4231.jpg


DSCN4236.jpg


DSCN4240.jpg


This pic really shows the oversize body:
DSCN4239.jpg


Half belt:
DSCN4263-1.jpg


Details:
DSCN4267-1.jpg


DSCN4262-1.jpg


DSCN4255-1.jpg


DSCN4241.jpg
 

MikeyB-17

Well-Known Member
Well that looks pretty damn good to me for a first attempt! Well played that man! :D Hope you're going to use the knowledge you've gained from doing this one to have another go!
 

fishmeok

Well-Known Member
So here's a summary of the first jacket, and what I did wrong...

1) I ROYALLY messed up the pattern. When I upsized the 40 pattern to what I thought was 46 I forgot about the body panel under the arm. Unlike an A-2 the seams do not meet at the armpit and go straight down, the extra panel overlaps front and back. I made the front piece 12" across, which would work out to about a 48 on an A-2 (first mistake there, should have been 11-11.5"). The side panel added another 2" to that, so I ended up with a body that was closer to a size 50, probably more as I made a similar mistake with the back panel.

2) When I upsized the pattern, I enlarged the collar and armholes proportionally. That's how I ended up with a 24" long collar. The armholes were also too big, making them low and baggy. After some conversations with Chapman and some thinking I realized that the collar and arm holes are only mildly upsized to keep the true fit of the jacket. I probably should have only added about a third of what I actually ended up with.

3) Working with leather- this was mostly a learning process, figuring out how my machine works and how to manipulate the complete jacket around on the machine while keeping and even tension under the sewing foot. My machine is very sensitive to control input, and it has very little internal friction. It will take off like a shot if I am not careful with the foot pedal, and takes a few stitches to stop after I lift my foot off.

I'm re-making my body panel patterns, and am going to try this again...
Cheers
Mark
 

C.J.

Member
Identifying the last rounds mistakes can only lead to an even better jacket on the next go. I still think the last one was a pretty damn good job for a first go. I'm really looking forward to seeing the next.
 
...Keep up the excellent work--very nice talent.

I have an A-2 Goat I can send you if you'd like to experiment on--take it apart, depot spray it, give it a WWII look, make it slimmer, etcetera...or whatever....

Let me know. ;)
 

art of a2

Member
PENSACOLA said:
...Keep up the excellent work--very nice talent.

I have an A-2 Goat I can send you if you'd like to experiment on--take it apart, depot spray it, give it a WWII look, make it slimmer, etcetera...or whatever....

Let me know. ;)

Wouldn't mind that myself..
 

fishmeok

Well-Known Member
Thanks everybody. I re-made parts of the pattern and am going to have another go at it.

Thanks for the offer for practice jackets, but I pretty much have my hands full with what I'm doing right now...
Cheers
Mark
 

fishmeok

Well-Known Member
Jacket number 2- looking much better.

This is the second try with the expensive hide- the body is complete including pockets and topsticthng. If I can manage to not mess up the collar we may have something here...

I'm much more comfortable with what I'm doing, although I am still having pattern troubles.
Cheers
Mark

Pocket installed:

DSCN4345.jpg


DSCN4348.jpg


Shoulder before topstitching

DSCN4350.jpg


And after

DSCN4361.jpg


DSCN4363.jpg


Underarm and seams;

DSCN4365.jpg


DSCN4357.jpg


Whole thing

DSCN4354.jpg


DSCN4353.jpg


High Armholes!

DSCN4351.jpg
 

Andrew

Well-Known Member
Looking good Mark, I don't know how you could teach youself to do this there's so much to it. It'll be a great sense of achievement to be able to make these for yourself.
 
Top