a2jacketpatches
Active Member
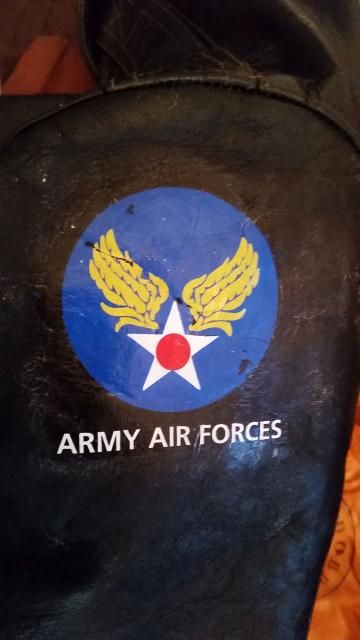
In advance of restoring an original jacket ( decal, back art, leather painted wings, and painted Squadron Patch ) I experimented with my theory that scale model decal setting solution would do the job. The following is a step by step using a Garcia decal, Microscale brand red label MICROSOL setting solutionand, a piece of JC's pebbled russet goatskin.
Step one - your surface must be lean and dry, one quick wipe down with 70% rubbing alcohol and let dry for a while, don't wipe more as you'll risk reactivating the finish of the leather, all your doing is cleaning the immediate surface. I chose this type of leather because of the serious grain, if I can get this right, anything else should be a breeze.

Step two - Have your materials ready ( soft clean brush, decal, setting solution ) Let the decal soak in warm water for about 5 minutes. I'd recommend cutting off the Army Air Force and doing it separately because when I did this as one piece the extension dragged behind as I carefully slid the decal off the backing and on to the leather. I had to mess with it a bit to position them correctly.

Step three - Apply a liberal amount of the solution to the area, it will soak in but that's ok, the chemical will remain on top to a degree and soften the film from underneath.

Step four - After applying the decal, positioning carefully, you'll have less than a minute to move it around before it starts to stick. Once in position let it set for about 5 minutes and then carefully puddle on a liberal amount of setting solution.

Step five - Now just let the solution work for about an hour, here's what happens as the stuff evaporates and the decal begins to settle into the texture.

All done, very happy with the results and I'm guessing it's on better than the originals were.