
-
When you click on links to various merchants on this site and make a purchase, this can result in this site earning a commission. Affiliate programs and affiliations include, but are not limited to, the eBay Partner Network.
You are using an out of date browser. It may not display this or other websites correctly.
You should upgrade or use an alternative browser.
You should upgrade or use an alternative browser.
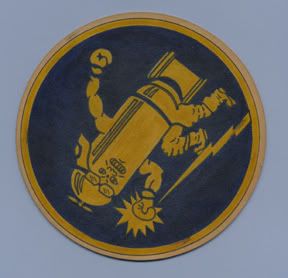
816th Bomb Squadron Patch - REVISED
- Thread starter CBI
- Start date


A
Anonymous
Guest
Re: 816th Bomb Squadron Patch
Hi CBI like the patch ,what type of paint are you using(oil or acryillic )and is that raw umber or burnt umber you coat over the patch to age it .Thanks for your contribution to the patch post ,your patch choices are units which rarely get exposure .
All the best Jeff
Hi CBI like the patch ,what type of paint are you using(oil or acryillic )and is that raw umber or burnt umber you coat over the patch to age it .Thanks for your contribution to the patch post ,your patch choices are units which rarely get exposure .
All the best Jeff
CBI
Well-Known Member
Re: 816th Bomb Squadron Patch
I always use enamels. Acrylic paints are a post-WWII invention and to me (sorry to say) it’s pretty rare to see patch art/jacket art done with acrylics that looks convincing (not suggesting I am an expert). I am not saying that the acrylic work is not good, it just always looks like a modern repro and not, “I just reached into a time vortex and pulled this patch off of a desk in 1940.” True, many patches survived the war with very little wear; I just like the multi-mission look. I think as seen with the 816th patch, I have been able to get the exact same texture/settling characteristics as WWII era lead based enamels. It’s taken a fair amount of experimentation. There are many techniques for ageing, partly the way I am painting them (dabbing the brush vs. brush stokes) as well as the wash (which is an acrylic paint). I also put a protective clear coat over them. Incidentally, I bent/folded the heck out of this patch AFTER I painted and aged it and there was no cracking of the enamel paint. If there was, it would possibly add to the look. I work the leather over beforehand so there is added texture. I have horsehide pieces for patches but I am saving those for "real" jobs - as part of complete jacket projects. The three patches posted recently are just for fun however I did them to experiment with some different techniques/approaches. The leather used is/are Tandy Leather tooling sheets. Surprisingly close to the type of leather used in the Mediterranean in WWII. I never seem to have enough time to get these done and end up taking a few pics at the end. I have been meaning to take a photo before the ageing process so folks can see the "full color" versions. To answer an earlier post, I am not really set up to do paid patch gigs. I would need to charge an arm and a leg to justify the disruption that doing this at home would entail. On the flip side, it would be fun to "have to do it". I guess it would also depend on the specific job. Sorry to be less than 100% clear on this but I am not sure about doing them "retail".
I always use enamels. Acrylic paints are a post-WWII invention and to me (sorry to say) it’s pretty rare to see patch art/jacket art done with acrylics that looks convincing (not suggesting I am an expert). I am not saying that the acrylic work is not good, it just always looks like a modern repro and not, “I just reached into a time vortex and pulled this patch off of a desk in 1940.” True, many patches survived the war with very little wear; I just like the multi-mission look. I think as seen with the 816th patch, I have been able to get the exact same texture/settling characteristics as WWII era lead based enamels. It’s taken a fair amount of experimentation. There are many techniques for ageing, partly the way I am painting them (dabbing the brush vs. brush stokes) as well as the wash (which is an acrylic paint). I also put a protective clear coat over them. Incidentally, I bent/folded the heck out of this patch AFTER I painted and aged it and there was no cracking of the enamel paint. If there was, it would possibly add to the look. I work the leather over beforehand so there is added texture. I have horsehide pieces for patches but I am saving those for "real" jobs - as part of complete jacket projects. The three patches posted recently are just for fun however I did them to experiment with some different techniques/approaches. The leather used is/are Tandy Leather tooling sheets. Surprisingly close to the type of leather used in the Mediterranean in WWII. I never seem to have enough time to get these done and end up taking a few pics at the end. I have been meaning to take a photo before the ageing process so folks can see the "full color" versions. To answer an earlier post, I am not really set up to do paid patch gigs. I would need to charge an arm and a leg to justify the disruption that doing this at home would entail. On the flip side, it would be fun to "have to do it". I guess it would also depend on the specific job. Sorry to be less than 100% clear on this but I am not sure about doing them "retail".
TankBuster
Active Member
Re: 816th Bomb Squadron Patch
Another beauty! Excellent aging!
Another beauty! Excellent aging!
A
Anonymous
Guest
Re: 816th Bomb Squadron Patch
Hi CBI thanks for your answer most informative ,which brand of paint do you use .Did you ever think of contacting John Chapman for leather scraps that may be suitable for your patches ,I would think he would have plenty pre aniline he could let you have .I know what you mean about turning it into a buisiness and what you would have to charge ,besides when you turn your passion into a buisiness you end up hating your passion.Thanks CBI for your pictures and input ,I do not think the the patch forum has been as interesting as it is now . All the best Jeff .
Hi CBI thanks for your answer most informative ,which brand of paint do you use .Did you ever think of contacting John Chapman for leather scraps that may be suitable for your patches ,I would think he would have plenty pre aniline he could let you have .I know what you mean about turning it into a buisiness and what you would have to charge ,besides when you turn your passion into a buisiness you end up hating your passion.Thanks CBI for your pictures and input ,I do not think the the patch forum has been as interesting as it is now . All the best Jeff .
CBI
Well-Known Member
Re: 816th Bomb Squadron Patch - REVISED
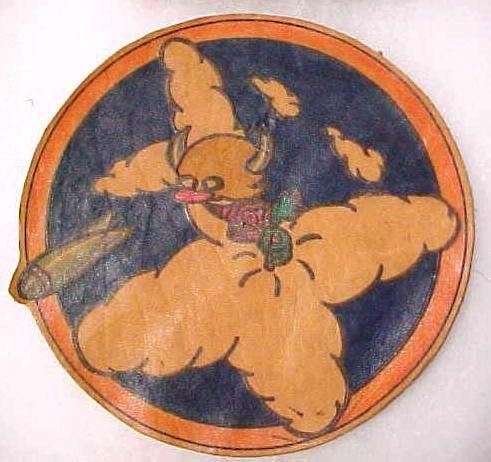
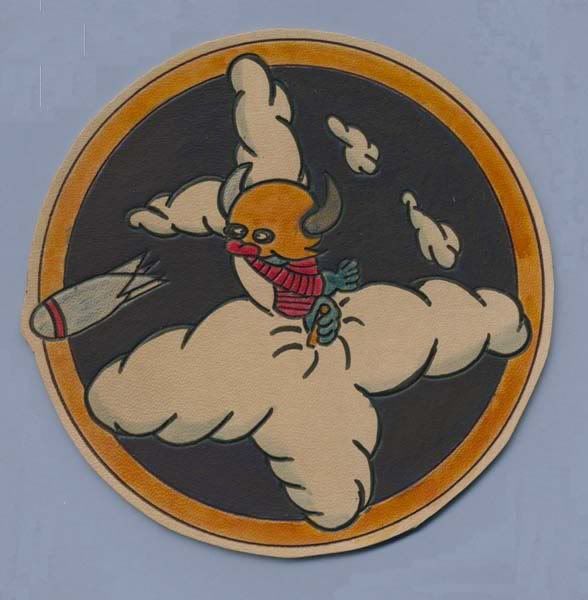
Some might think, “I can’t believe he messed up that patch.” Just all part of the experimental process. Here, a different way of ageing - removing layers. I believe this is indistinguishable from a genuine 60 year old patch. I doubt anyone would want to purchase a repro that looks this rough but I am intrigued with the idea of “clone” WWII patches. Back to the new "just issued" WWII look with my next ones. Can’t wait to get moving on actual jackets. Work is getting busy now and will be through May so possibly nothing else for a while.


Some might think, “I can’t believe he messed up that patch.” Just all part of the experimental process. Here, a different way of ageing - removing layers. I believe this is indistinguishable from a genuine 60 year old patch. I doubt anyone would want to purchase a repro that looks this rough but I am intrigued with the idea of “clone” WWII patches. Back to the new "just issued" WWII look with my next ones. Can’t wait to get moving on actual jackets. Work is getting busy now and will be through May so possibly nothing else for a while.
cheaterome
Member
Beautiful work.
I really like the aged look as well but rarely do you get a jacket from a customer that has the look of a 60 year old garment.
I like to match a patch to the quality and age of the jacket and take it from there. Enamels do lay down nice and their coverage and opacity is excellent but they will crack eventually. I have done patches with Pactra model enamels, One Shot and Testors and some other hobby model railroad stuff. A couple years into it with normal wear it all just flakes off..yes realistic and theater perfect but money from customers not well spent.
Acrylics can look just fine if you mix them right plus they are flexible and seem to last for a good long time. Plus they can look theater produced. It is a concoction of various sorts for sure though. What I find is a good idea is to go vintage leather jacket hunting down in Chicago and buy the jackets just to cut up for leather ..which buy the way is cheaper than buying in bulk from your local leather supply store.
Acrylics......


Incised and lightly aged.....,


Lightly embossed and aged.....

Restored......


I really like the aged look as well but rarely do you get a jacket from a customer that has the look of a 60 year old garment.
I like to match a patch to the quality and age of the jacket and take it from there. Enamels do lay down nice and their coverage and opacity is excellent but they will crack eventually. I have done patches with Pactra model enamels, One Shot and Testors and some other hobby model railroad stuff. A couple years into it with normal wear it all just flakes off..yes realistic and theater perfect but money from customers not well spent.
Acrylics can look just fine if you mix them right plus they are flexible and seem to last for a good long time. Plus they can look theater produced. It is a concoction of various sorts for sure though. What I find is a good idea is to go vintage leather jacket hunting down in Chicago and buy the jackets just to cut up for leather ..which buy the way is cheaper than buying in bulk from your local leather supply store.
Acrylics......
Incised and lightly aged.....,
Lightly embossed and aged.....
Restored......
CBI
Well-Known Member
Jerome - thanks and of course - great work from you as always. I know what you mean about the enamels. I have had good luck with them holding togther with some extended rough wear (years). I have used some sealers that seem to prevent the peel off. Lots of originals have held up well with enamles - and others have not as we have seen. The acrylics are a challenge in regards the theater look for sure, there's most always that "plasticy" look. Luckally, there is a good cross section of patch/jacket folks that do this stuff and many different techniques. Looking at your artwork was one of the motivators to start doing this myself - just for fun of course. Great suggestion about the leather - buying old jackets and cutting them up. Yes, the leather store option can be very pricey. In the case of the Med patches, I do like the tooling sheets from Tandy as that's a smiliar type of leather as used in WWII, not perfect but I can get by! In regards "ageing" I do like/prefer a heavily worn theater look - 40's pilot still flying missions (second tour!!) more than the 60 year old looking stuff however its fun to paly with it all. In regards my own jackets, if they are new, I do a bit of ageing. Nothing beats honest wear but I do like tinkering with jackets and frankly, we have almost no winter here in the mid-south so it can take years to break in a jacket.
Again - so many cool jackets and artwork of yours that have been a joy to look at! Thanks for posting.
Again - so many cool jackets and artwork of yours that have been a joy to look at! Thanks for posting.
cheaterome
Member
Yeah my friend actually uses automotive based urethane paints and house of color urethane pin-striping paint.
and it seems to work pretty good so far both of the jackets he has done are a couple years old and are holding up well.
I think the key is not building up too much base (color) for the enamels. The thickness leads to it not being flexible.
Yeah the acrylics do tend to have a plasticky feel when used straight out of the bottle or tube, but that is the ingredient. Acrylic = plastic.
Having an acrylic sealer protects the paint and if mixed about 50-50 with water can get rid of the "platsticky" build up and feel.
Tandy is awesome.... oak leather tooling sides when they are on sale work good for me. I usually try to get 2.0- 2.5oz. sides . Another thing I find really crazy is the actual variety in thickness of original tooled patches.
I have seen some that are like 5 oz.- 6 oz. thick !!!! They feel like drink coasters.
Cool,
Jerome
TankBuster
Active Member
I used to have a original incised/tooled patch that was roughly 4.5-5 oz. thick.
You're right about the drink coaster feeling. I don't get how the pilot could
take it. It was like a rock on the front of his A-2 jacket. It looked cool though!
You're right about the drink coaster feeling. I don't get how the pilot could
take it. It was like a rock on the front of his A-2 jacket. It looked cool though!
CBI
Well-Known Member
Yes, some of those original 15thAF leather patches were REALLY thick. I have an original 48-star flag patch that is like a coaster! I use the 8x10 Tandy thin sheets. Yes, got to keep the pile way down with the paint. I will take two brushfulls of enamel paint and mix a third brush dipped in mineral spirits to get the paint to thin enough to avoid any pile. The enamel seems to hold really well. I do mix down the over-coat. Interesting for example that on the 816th patch above, re-ageing it, the acrylic wash and acrylic protective coat came off with some work but I really had to go after the enamel paint to have any of it come off. Anyway, lots of cool ways to create these things and all of this talk really makes me want to start more jackets - too bad work always seems to get in the way.
shedonwanna
Active Member
I prefer not using enamels if the patch is going on a jacket. Acrylic colors (especially Tandy's Cova) are horrible straight from the tube and always, at minimum, get mixed with a compliment color. Leather dyes and stains also work well with tooling leather. Experiment, take notes and keep a sample swath for references. This patch used leather dye.
CBI
Well-Known Member
Whatever works! I have tried the dyes and I have not been able to get them to look like convincing 1940's paints. The reason for the enamels is they are the closest to what was used back then. I believe I have been able to take care of the cracking problem that some have suggested is a problem with enamels. I have never actually had the problem as I keep the pile very low and thin the paint down. In the case of Testors and Model Master the colors are out of the bottle pretty close so mixing them to get a vintage color is pretty easy. I spent a lot of time with acrylics as well with results I did not care for. Sounds like many folks have had luck with different options. In any case, to each his own ...........................................
shedonwanna
Active Member
Here is a vintage 560th BS followed by a reproduction. The 388th BG used leather dye for their patches since they were aware of the perils of paint on animal skins. Several other units were known to use leather dyes/washes instead of paint. Adding a varnish to an oil based paint was often used to add artwork to the back of a flight jacket. No matter what you use in 60 years it will likely be flaking and cracking. The vintage 388th patches I have handled are still soft and vibrant if the leather has been protected. One 560th patch we found was in the A-2 pocket and the only defect was a rust mark left by the pocket snap.
Vintage:
Reproduction(some tooling added - vintage was not tooled):
Vintage:
Reproduction(some tooling added - vintage was not tooled):
Members online
Total: 298 (members: 5, guests: 293)